
Compress images without losing quality: what the slider actually does
Dragging a 4 MB JPG into a compressor and cranking quality to 95 feels safe — but for most photos, 85 looks the same on screen while the file is several times smaller. Here is what the slider really controls, and where to set it on ShrinkLocal.
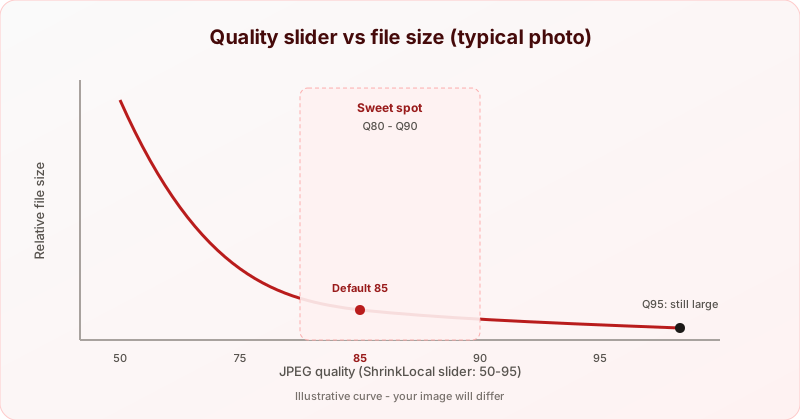
You open ShrinkLocal, drop a large photo, and see a Quality slider (50–95, default 85). If your instinct is to push toward 95 so you do not “lose anything,” you are not alone — and you are probably overshooting.
For typical camera photos and phone shots, the visible difference between quality 85 and 95 is negligible at normal viewing distance. The file size difference is not.
Try it locally — adjust quality, compare sizes, nothing uploaded.
“Quality 85” is not “85% of your image”
JPEG quality numbers are not percentages. Different apps map the same label to different internal settings. What the slider actually controls is how aggressively the encoder rounds off high-frequency detail — texture, fine noise, micro-contrast your eye barely notices.
Lowering quality from 95 to 85 does not uniformly blur the photo. It mostly removes information vision is bad at detecting. Problems show up predictably on sharp text, logos, and smooth gradients (sky, skin, fog) — where banding and edge ringing appear first.
The sweet spot, by the numbers
Exact file sizes depend on your image. The shape of the curve is consistent for photographs:
| Quality | vs. max (Q95) | What you see | Typical use |
|---|---|---|---|
| 95 | Baseline (largest) | Imperceptible vs 90 on screen | Print, pro portfolios |
| 90 | Often ~70–80% of Q95 size | Still invisible at normal zoom | High-quality web, hero images |
| 85 | Often ~50–65% of Q95 size | Barely visible at 200% zoom | ShrinkLocal default — blogs, galleries |
| 80 | Smaller still | Soft on close inspection | General web, email |
| 75 | Diminishing returns | Artifacts on edges/text | Thumbnails, previews |
| 50–70 | Only slightly smaller than 75 | Blocking, banding obvious | Avoid for photos |
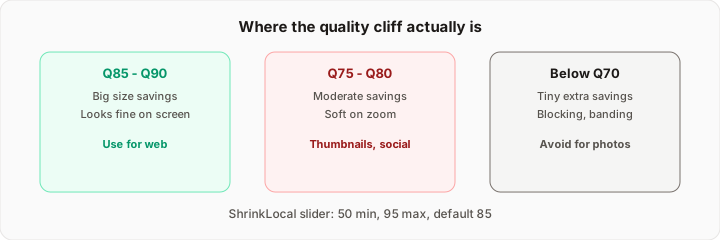
Two rules worth remembering:
- Chasing 95+ is expensive. Going from 90 to 95 often doubles bytes with no visible gain on a laptop or phone screen.
- Below 75 is where damage shows. Each step down saves less file size but adds more obvious artifacts — especially on UI screenshots and logos.
For most web work: stay in 80–90. Use 90–95 only when the audience pixel-peeps (print, photography portfolios) or the platform will not re-encode your upload.
Where JPEG saves bytes (and where it fails)
JPEG is built around human vision. It discards detail eyes struggle to see — high frequency, subtle color noise, micro-texture in busy scenes.
Works well on: natural photos, portraits, landscapes, anything with organic texture.
Works poorly on: screenshots, charts, flat-color graphics, logos, sharp UI. For those, even high JPEG quality looks worse than PNG or WebP. Pick the right output format first; tune quality second.
Quality cheat sheet by use case
| Use case | Start at | Notes |
|---|---|---|
| Blog cover / article image | 85 | Readers focus on text; page weight matters |
| E-commerce product photo | 85–90 | Detail influences trust; still compress |
| Email attachment | 80–85 | Balance size with mailbox limits |
| Social media | 75–85 | Platforms re-encode anyway — Q95 is wasted |
| Thumbnail / preview | 70–80 | Small display hides softening |
| Print or photo book | 90–95 | Print reveals artifacts screens hide |
When you should not re-compress
JPEG is generational. Every save applies another round of lossy rounding. Open a JPG, compress, save, open again, compress again — and you get generation loss: mushy edges and ghosting around high-contrast lines.
- Keep a master as RAW, TIFF, or PNG; export JPEG only at publish time.
- If you must edit a JPG, work on a copy; avoid JPG → PNG → JPG hoping to “recover” quality — the first JPG already threw data away.
- On ShrinkLocal, decode once and encode directly to your chosen format — no chained cloud tools.
Why MozJPEG on ShrinkLocal
ShrinkLocal uses MozJPEG (via jSquash / Squoosh family) in Web Workers — same modern encoder many performance-focused sites target. At the same quality number, MozJPEG often produces smaller files than older libjpeg defaults, with similar visual results.
WebP output uses a separate slider scale; treat WebP 80–85 as a rough match to JPEG 85 for photos. See our WebP vs JPEG guide when choosing output format.
How to find the right quality for your image
- Pick one representative photo (include sky, skin, or text if relevant).
- On ShrinkLocal, export at 90, 85, and 75 (same format).
- View all three at 100% zoom on your target screen.
- Use the lowest setting where you cannot see a difference.
Because everything runs locally, you can batch-test without uploading sensitive files — see how it works in DevTools.
For batch jobs with hundreds of similar photos, pick one target (85 is a sane default) and ship. Per-image tuning rarely pays off at scale.
The setting that actually matters
Do not max the slider out of fear. For web photos, 85 is where ShrinkLocal starts because it lands in the sweet spot for blogs, email, and galleries without making you think about encoder math.
Go to 90–95 for print and pro work. Drop toward 75–80 only when display size is tiny or the platform will crush quality anyway.
And when the subject is text, logos, or flat graphics — skip aggressive JPEG. Use WebP (transparency) or keep PNG. Compression cannot fix the wrong format.
Ready to compress with sensible defaults?